


Gusto mong Mag succeed sa iyong Online marketing business? Pinoy Networker must watch this tips for your video powerpoint presentation very powerful and very effective strategy for your business online...
Showing posts with label Blogging tutorial. Show all posts
Showing posts with label Blogging tutorial. Show all posts
Saturday, March 29, 2014

Thursday, March 27, 2014
Listwire AutoResponder: Creating Messages and Broadcasts
As mentioned in the first video on how to setup Listwire, this is an autoresponder that allows you to automatically send out emails, newsletters or broadcasts. You can set them to go out over a period of time or at a specific day and time.
Professional Looking for Video Blog Watch This...
In this Video Matututunan mo kung paano Gumawa ng isang Professional Good Looking Video Blog... Must Watch And Learn to Get more Traffic of your Blog...
Saturday, March 8, 2014
The Ideal Format To Use and Why: Blogs
Wednesday, February 26, 2014
How to change your blogger template like pro for free

This tutorial is for Blogger blogspot user only. How to change your template like pro? Here the simple tutorial to change your blogspot template.
Saturday, November 2, 2013
New Blogger Widget (Facebook Profile with facebook Follow botton)

here's my own version of facebook profile widget for blogspot.com simply and easy to create.
Sunday, October 27, 2013
About Pages
You can create stand-alone pages linked from tabs or sidebars on your blog. These pages function differently than the homepage of your blog -- you can think of each page as containing only one post, while your blog's homepage contains multiple posts and pushes the most recent posts to the top.
Posting & Editing (Link to other websites)
- Highlight the text you'd like to turn into a link. If you do not select any text before using the link button, your link will be created but without anything to click on.
- Click the Link button (or hit control+shift+a on your keyboard):
- A pop-up window will appear prompting you for a URL you'd like to link to. Type the URL in the text box.
<a href="http://URL">TEXT</a>
Here's an example scenario:
Let's say you want to tell people about some cool website you found, let's call it, www.somecoolwebsite.com. Here's an example of what you might type into your blog:Hey all. Check out
<a href="http://www.somecoolwebsite.com">this site</a>! It's a really cool website I found.In this example, the word "this" would be the link to www.somecoolwebsite.com. That is, it would show up as a blue underlined word on your blog. The key things to note are:
- The "a href" stuff must be enclosed in these kind of brackets <>. That lets the computer know you're entering HTML and not just typing stuff to be displayed.
- The website you want to link to must be in quotes, and must always start with http://. If you don't have the http://, the link probably won't work.
- Any text you type after the > that closes out the bit where you write the website address will be the actual link that shows up on your blog. The tag lets the computer know that any text after is just normal text and should not be part of the link. Note: You have to put the > in, otherwise the rest of your blog post will be treated as a link, and it will probably cause other weird things to happen that you don't want.
Gusto mo bang kumita gamit ang internet?
watch this video presentation para sa konting guide.
The
above tip is brought to you by Patrick Gino, who enjoys helping people
to make extra income through the help of the internet. For more info,
please
click here http://www.viloria.net/swa-pinoy/swa-tmv2.shtml?patrickgino
Saturday, October 26, 2013
Posting & Editing (Delete a post)
To delete a specific post, just go to the Posts tab from your Dashboard, and hover over the post you'd like to delete. The Delete
link should appear when you hover -- click that, and then confirm your
deletion. To delete multiple posts at once, you can check the boxes next
to all the posts you'd like to delete, and click the trash can icon.
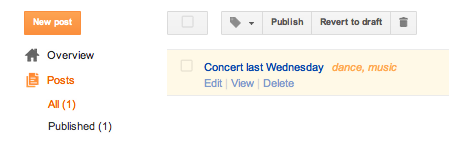
When you delete a post, the post is only deleted from your blog. If you’ve posted your content in other places, such as a Google+ post (see example below), you will need to delete that content separately. Once you delete your blog post, any links to that blog post will result in a 404 error page.
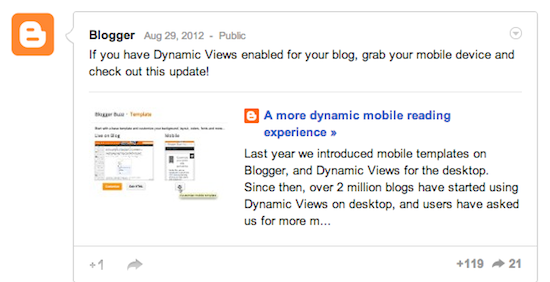
When you delete a post, the post is only deleted from your blog. If you’ve posted your content in other places, such as a Google+ post (see example below), you will need to delete that content separately. Once you delete your blog post, any links to that blog post will result in a 404 error page.
Gusto mo bang kumita gamit ang internet?
watch this video presentation para sa konting guide.
The below presentation is brought to you by Patrick Gino, who enjoys helping people and make money on the internet. For more information, please visit http://www.viloria.net/swa-pinoy/swa-tmv2.shtml?patrickgino
About the Navbar
The Blogger Navbar appears by default at the top of every Blogger-powered blog, unless you're using Dynamic Views.

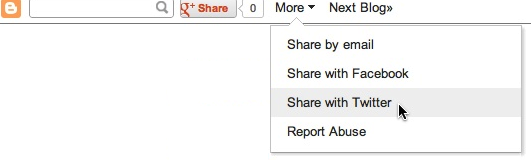
 Navbar features include:
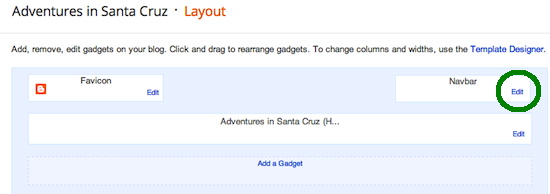 Notes:
- [B]: Takes you back to
www.blogger.com. - Search box: Searches the blog you're viewing. Results will appear directly on the page.
- G+ share button: Lets you share the blog to your circles on Google+.
- More: This drop-down lets you share the blog by email or on other social websites as well as notify our team of a Terms of Service violation by clicking "Report Abuse." You can also report abuse through our Help Center.
- Next Blog: Takes you to a recently-updated Blogger blog similar to the one you're currently viewing.
- [email address]: If you're signed in to your account, you'll see your own address here. Other viewers will see their own email addresses, or none at all if they aren't signed in.
- New Post and Design: If you're signed in, these links will take you to your Blogger Dashboard.
- Sign In/Out: This displays the appropriate option, depending on whether you're signed in or not.
- We've made every effort to make sure the Navbar doesn't interfere
with custom template designs. However, some display problems may occur.
Here are a few things to try if you are running into trouble:
• add
style="margin-top:40px;"to the topmost element of your Template. (i.e.<table>would become<table style="margin-top:40px;">)
• make sure the closing</head>tag is present; it should go before the<body>tag.
Gusto mo bang kumita gamit ang internet?
watch this video presentation para sa konting guide.
The
above tip is brought to you by Patrick Gino, who enjoys helping people
to make extra income through the help of the internet. For more info,
please
click here http://www.viloria.net/swa-pinoy/swa-tmv2.shtml?patrickgino
About URLs
A URL is the address of a file on the Web, such as
During the blog creation process, you'll have to select a URL for your blog. Visitors can access your blog by typing this URL into the address bar of their browsers.
Since there are already a large number of Blogspot blogs, you'll need to get creative and possibly try a few different URLs before you find one that's available. The format for your URL will be
When selecting your blog's URL, remember that you can only use letters, numbers, and hyphens. Special characters such as $, #, &, etc. are not permitted.
You can find and edit your blog's URL by going to Settings | Basic.
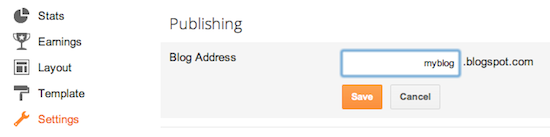 Remember that if you change your blog's URL, you release the old URL
for other bloggers to use. You can also host your blog on a custom domain.
Remember that if you change your blog's URL, you release the old URL
for other bloggers to use. You can also host your blog on a custom domain.
www.example.com, or foo.example.com.During the blog creation process, you'll have to select a URL for your blog. Visitors can access your blog by typing this URL into the address bar of their browsers.
Since there are already a large number of Blogspot blogs, you'll need to get creative and possibly try a few different URLs before you find one that's available. The format for your URL will be
nameyouchoose.blogspot.com.When selecting your blog's URL, remember that you can only use letters, numbers, and hyphens. Special characters such as $, #, &, etc. are not permitted.
You can find and edit your blog's URL by going to Settings | Basic.
Remember that if you change your blog's URL, you release the old URL
for other bloggers to use. You can also host your blog on a custom domain.
Gusto mo bang kumita gamit ang internet?
watch this video presentation para sa konting guide.
The
above tip is brought to you by Patrick Gino, who enjoys helping people
to make extra income through the help of the internet. For more info,
please
click here http://www.viloria.net/swa-pinoy/swa-tmv2.shtml?patrickgino
Blog Search FAQ

Your results include all blogs, not just those published through Blogger; our blog index is continually updated, so you'll always get the most accurate and up-to-date results; and you can search not just for blogs written in English, but in French, Italian, German, Spanish, Chinese, Korean, Japanese, Brazilian Portuguese and other languages as well.
How do I find Blog Search?
There are a few different ways you can get to Blog Search:
- blogsearch.google.com (Google-style interface)
- search.blogger.com (Blogger-style interface)
- The Blogger Dashboard
- The Navbar on any Blog*Spot blog
How do I use Blog Search?
Just type the word(s) you want to search for in the text box and click "Search." That's all there is to it!
If you want more control over your search, click the "Advanced Search" link to the right of the search button. There you'll find options to specify titles, authors, languages and more. Once you get your search results, there will be an additional link that allows you to switch between displaying the results with either the most relevant or recent results at the top.
In the Blogger version of the interface, there is an extra "use search options" link beneath the search box. This will show a few of the most common advanced options, such as a specific blog or a date range to search within.
Which blogs are included in Blog Search?
The goal of Blog Search is to include every blog that publishes a site feed (either RSS or Atom). It is not restricted to Blogger blogs, or blogs from any other service.
How do I get my blog listed?
If your blog publishes a site feed in any format and automatically pings an updating service (such as Weblogs.com), we should be able to find and list it. Also, we will soon be providing a form that you can use to manually add your blog to our index, in case we haven't picked it up automatically. Stay tuned for more information on this.
Why aren't my oldest posts listed?
Since Blog Search indexes blogs by their site feeds, it will only include items that have been posted since it started indexing a given blog. For most blogs, that will be around June 2005, or the time at which you submitted your blog for inclusion. We are working on ways to include older posts as well.
What if I don't want to be listed?
If you do not publish a site feed for your blog, it will not be included in Blog Search. However, if you previously published a site feed that was included, the old posts will remain in the index, even though new ones are not added.
Blog Search will also respect
robots.txt files and NOINDEX, NOFOLLOW meta tags, as described here.How does Blog Search work?
Blog Search indexes blogs by their site feeds, which will be checked frequently for new content. This means that Blog Search results for a given blog will update with new content much faster than standard web searches. Also, because of the structured data within site feeds, it is possible to find precise posts and date ranges with much greater accuracy.
Can I search for entire blogs or individual posts?
You can use Blog Search to find either specific posts or entire blogs. The main search results always return links to posts. However, when there are entire blogs that seem to be a good match for your query, these will appear in a short list just above the main search results.
Can I subscribe to search results?
Yes. At the bottom of each page of search results you can find several links, offering the top 10 or 100 results as either Atom or RSS feeds. Just grab the links from here and subscribe to them in the news aggregator of your choice and you will get updates whenever new posts are made that match your query.
(If you've never subscribed to feeds before, check out Blogger Help and AtomEnabled for more information, along with links to various programs you can use to subscribe.)
What search operators are supported?
All of the standard Google Search operators are supported in Blog Search. These include:
- link:
- site:
- intitle:
- inblogtitle:
- inposttitle:
- inpostauthor:
- blogurl:
mandolin inpostauthor:Graham]
will show you posts about mandolins written by people named Graham.
Note that you can also use the Advanced Search option to achieve the
same effect.Can I find blogs in specific languages?
Yes, you can restrict results to any of 35 specific languages by using the Advanced Search options. Just check the boxes next to the languages you want to include. By default, results include blogs written in all languages.
Does Blog Search support SafeSearch filtering?
Yes, SafeSearch can be used to filter out adult sites, just like in Google Search.
What do I do if I still have questions?
Just contact the Blog Search Team.
Gusto mo bang kumita gamit ang internet?
watch this video presentation para sa konting guide.
The
above tip is brought to you by Patrick Gino, who enjoys helping people
to make extra income through the help of the internet. For more info,
please
click here http://www.viloria.net/swa-pinoy/swa-tmv2.shtml?patrickgino
Monday, September 30, 2013
Blogger and browser compatibility
Here's a list of browsers and operating systems that work with Blogger.
Note: Other browsers might work with Blogger. However, we can't guarantee that features will work as expected.
* For best results, turn off Compatibility View.
No matter what browser you use, here's what you need to do:
| Windows XP/7 | Linux (Ubuntu) | MAC OSX 10.4 + | Mac OSX 10.3.9 and below | |
|---|---|---|---|---|
| Google Chrome | ✓ | ✓ | ✓ | ✓ |
| Safari 4 + | ✓ | ✓ | ||
| Internet Explorer 9* | ✓ | |||
| Internet Explorer 10* | ✓ | |||
| Firefox 3.6 + | ✓ | ✓ | ✓ |
Note: Other browsers might work with Blogger. However, we can't guarantee that features will work as expected.
* For best results, turn off Compatibility View.
No matter what browser you use, here's what you need to do:
Gusto mo bang kumita gamit ang internet?
watch this video presentation para sa konting guide.
The
above tip is brought to you by Patrick Gino, who enjoys helping people
to make extra income through the help of the internet. For more info,
please
click here http://www.viloria.net/swa-pinoy/swa-tmv2.shtml?patrickgino
About Blogger profiles
This article is about your Blogger profile. You can also use your Google+ profile with your blogs.
Think of your profile as an easy way to create an "About Me" page
supplemental to your blog. You can describe yourself, share your
interests, include a photograph of yourself, and change your display
name. Your interests, favorites, and other items act as links to other
people whose profiles share the same things. Others can access your
profile by clicking on your Blogger display name (i.e., when you leave a
comment with your display name, or end your posts with "Posted by
[display name]"), your profile widget, or by discovering your profile
through shared interests.To change your profile information, click the drop-down menu next to your username on the top-right corner of your dashboard.
To display your profile gadget on a particular blog:
- Go to Layout
- Click Add a gadget
- Scroll down and select Profile
Gusto mo bang kumita gamit ang internet?
watch this video presentation para sa konting guide.
The
above tip is brought to you by Patrick Gino, who enjoys helping people
to make extra income through the help of the internet. For more info,
please
click here http://www.viloria.net/swa-pinoy/swa-tmv2.shtml?patrickgino
Sunday, September 29, 2013
Blogger Template Designer

Blogger Template Designer
is a new way for you to easily customize the look of your blog. You can select a variety of templates, images, colors, and column layouts to
make your blog an expression of you. To get to the Template Designer,
just click on the drop-down menu of the gray Post List icon, and select
Template. From there, you'll be able to choose and customize your template. As you play around with the Template Designer, you’ll see a preview
of how the blog will appear based on the choices you’ve made, which you
can expand to by pressing the toggle to Expand Preview
between the Blogger Template Designer dashboard and the preview. When
you’re satisfied with the look of your blog, you can make them go live
by pressing Apply to Blog in the top right hand corner of the Template Designer.To get started with Blogger Template Designer, select a template for
your blog from one of the professionally designed templates that are
available. Each template appears as a large thumbnail that when clicked
will show different variations on the template below that you can select
by clicking on them. Note that clicking a new template will erase any
customizations you’ve made on a previous template. Once you’ve chosen a template, you can continue customizing the look of your blog.
Blogger Getting Started Guide
Welcome to Blogger! This guide can walk you through how to create a
blog, and help you familiarize yourself with the main features of
Blogger.
Pick an address (URL) and a blog title. Then, choose your favorite blog template (this is how your blog will look when you publish it). Now get creative, add information to your personal profile, and customize how your blog looks, if you feel up to it. Start blogging now!
Back to top
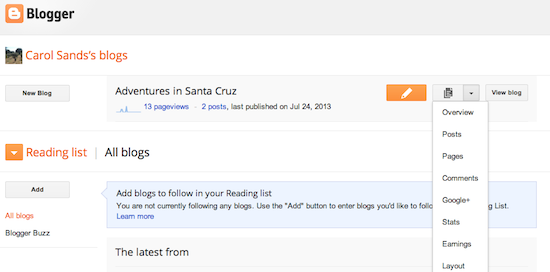
Your Dashboard, as always, is your starting point. This is where all your blogs are listed, and you can click on the icons next to them to perform various actions on each blog, such as:
Back to top
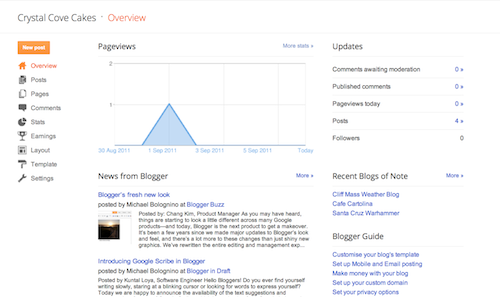
On the Overview tab, you can see your blog’s activity, news and tips from the Blogger team, and recent Blogs of Note.
Back to top
Once you've selected your image, you can then choose a layout to determine how your image will appear in your post:
You can also publish images to your blog using your mobile device, Google's free photo software Picasa, or a third-party service like flickr. Learn more
Back to top
Click Browse to select the video file from your computer that you'd like to upload. Note that Blogger accepts AVI, MPEG, QuickTime, Real and Windows Media files and that your video must be less than 100MB in size.
Before uploading your video, add a title in the 'Video Title' box and agree to the Terms and Conditions (you'll only have to do this the first time that you upload a video with Blogger). Then click UPLOAD VIDEO.
While your video uploads, you'll see a placeholder in the post editor showing where your video will appear. You'll also see a status message below the post editor letting you know that your upload is in progress. Depending on the size of your video, this usually takes about five minutes. When it is complete, your video will appear in the post editor.
Back to top
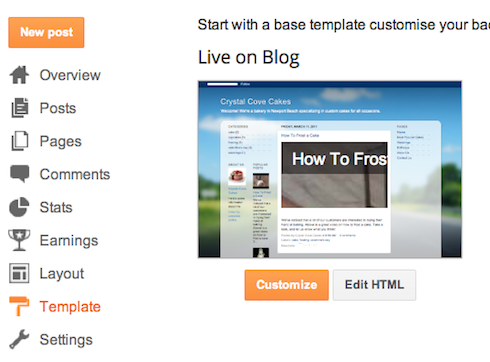 Once on the Template tab, you can either click on the orange Customize
button to get started with our easy-to-use WYSIWYG (“What you see is
what you get”) template designer, or choose one of our many default
templates. If you’d like to edit the HTML of your blog, just click the
gray Edit HTML button.
Once on the Template tab, you can either click on the orange Customize
button to get started with our easy-to-use WYSIWYG (“What you see is
what you get”) template designer, or choose one of our many default
templates. If you’d like to edit the HTML of your blog, just click the
gray Edit HTML button.
In addition, you can customize your blog's design using our intuitive drag-and-drop interface. You can also add powerful gadgets such as slideshows, user polls, or even AdSense ads. If you want more precise control over your blog's layout, you can also use the Edit HTML feature. To edit your blog's layout, follow these steps:
To start using Blogger, simply sign in
with your Google Account. (If you use Gmail, Google Groups, or orkut,
you already have an account.) If you don't have a Google Account yet,
you can create one now.
Contents
Create a blog
To start a blog with Blogger, visit the Blogger homepage, enter your username and password, and click Sign in. Enter a display name and accept Blogger's Terms of Service. Then click the Create a Blog link and get started!Pick an address (URL) and a blog title. Then, choose your favorite blog template (this is how your blog will look when you publish it). Now get creative, add information to your personal profile, and customize how your blog looks, if you feel up to it. Start blogging now!
Back to top
Dashboard
Your Dashboard, as always, is your starting point. This is where all your blogs are listed, and you can click on the icons next to them to perform various actions on each blog, such as:
- Writing a new post: Just click on the orange Pencil icon on your Dashboard to access the Post Editor.
- Viewing your posts: The gray Post List icon will take you to a list of your published and drafted posts for a specific blog.
- Catching up on your favorite blogs: Below the list of your own blogs, you’ll see a list of the blogs you follow with an excerpt from their latest posts.
- Everything else: Check out the drop-down menu next to the Post List icon for a quick link to:
- Overview
- Posts
- Pages
- Comments
- Stats
- Earnings
- Layout
- Template
- Settings
Back to top
Overview
On the Overview tab, you can see your blog’s activity, news and tips from the Blogger team, and recent Blogs of Note.
Back to top
Write your post
Once you've signed in to Blogger, you'll see your dashboard with your list of blogs. Here's what you need to do:- Click the orange pencil icon to write a new post, and enter anything you want to share with the world.
-
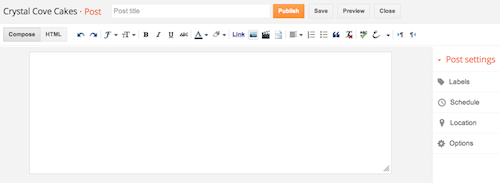
Next, you'll see the Post Editor page. Start by giving your post a title (optional), then enter the post itself:
-
When you're done, click the Preview button at the top to make sure it's ready to go, and then click the Publish button to publish your post.
Add an image
You can add an image from your computer or the Web to your blog. Click the image icon in the Post Editor toolbar. A window appears prompting you to browse for an image file on your computer, or enter the URL of an image on the Web.Once you've selected your image, you can then choose a layout to determine how your image will appear in your post:
- The 'Left', 'Center', and 'Right' options allow you to customize the way your blog text will flow around your image.
- The 'Image size' options will determine how large the image will appear within your post.
You can also publish images to your blog using your mobile device, Google's free photo software Picasa, or a third-party service like flickr. Learn more
Back to top
Add a video
To add a video to your blog post, click the film strip icon in the Post Editor toolbar above where you compose your blog text. A window appears prompting you to 'Add a video to your blog post.'Click Browse to select the video file from your computer that you'd like to upload. Note that Blogger accepts AVI, MPEG, QuickTime, Real and Windows Media files and that your video must be less than 100MB in size.
Before uploading your video, add a title in the 'Video Title' box and agree to the Terms and Conditions (you'll only have to do this the first time that you upload a video with Blogger). Then click UPLOAD VIDEO.
While your video uploads, you'll see a placeholder in the post editor showing where your video will appear. You'll also see a status message below the post editor letting you know that your upload is in progress. Depending on the size of your video, this usually takes about five minutes. When it is complete, your video will appear in the post editor.
Back to top
Customize
Your template is a fun way to customize your blog. When creating a new blog, you're first asked to choose a default template, this is the basic design of your blog. You can choose from many templates for your blog; simply pick the one that best fits your needs.
Once on the Template tab, you can either click on the orange Customize
button to get started with our easy-to-use WYSIWYG (“What you see is
what you get”) template designer, or choose one of our many default
templates. If you’d like to edit the HTML of your blog, just click the
gray Edit HTML button.In addition, you can customize your blog's design using our intuitive drag-and-drop interface. You can also add powerful gadgets such as slideshows, user polls, or even AdSense ads. If you want more precise control over your blog's layout, you can also use the Edit HTML feature. To edit your blog's layout, follow these steps:
- Click Layout from the drop-down menu on your dashboard below the blog you would like to customize.
- From there, click Edit to edit existing gadgets, or Add a Gadget to add new ones.
- To add a new gadget after you've clicked Add a Gadget, simply click the plus sign next to your desired gadget. You can choose from gadgets by category, or search for a specific gadget in the top right of the pop-up window.
- Once you've added the necessary information to your selected gadget, click the orange Save arrangement button. Your layout changes will appear instantly.
Privacy and permissions
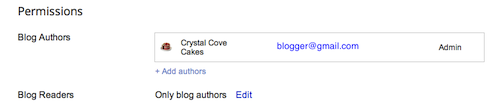
By default, your blog is completely public, and can be read by anyone on the internet. However, if you want to keep it private, you can do that, too. You can change these settings on the Settings | Basic tab.
- Under the 'Blog Readers' section, you'll probably see 'Anybody' selected as the default. When you change this to 'Only these readers,' you'll get an Add Readers button.
- Click the Add Readers button and then enter the email address of a person to whom you'd like to grant access to your blog. To add multiple people, separate their addresses with commas.
- For each address entered, the Google Account associated with that
address will be given access to view your blog. If an address is not
associated with an account, that person will receive an invitation email
with a link allowing them do one of three things:
- Sign in to an existing account.
- Create a new account.
- View your blog as a guest (no account required).
Gusto mo bang kumita gamit ang internet?
watch this video presentation para sa konting guide.
The
above tip is brought to you by Patrick Gino, who enjoys helping people
to make extra income through the help of the internet. For more info,
please
click here http://www.viloria.net/swa-pinoy/swa-tmv2.shtml?patrickgino
Saturday, September 28, 2013
Six ways to improve your blog with Google+


Add Google+ buttons and gadgets
Help readers follow and share your posts on Google+ with the +1 button, Google+ badge, and Google+ Followers gadget. Visit the Layout tab, click "Add a gadget," and select the Google+ gadgets you'd like to add.
Tuesday, July 16, 2013
SWA Basic Orientation Must watch.

Saturday, July 6, 2013
How To Publish Blog Post When you Travel or in Exam Hall
Blog post publishing is
monotonous work so you have to do this work constantly. If you have time or not
you have to keep posting to hold your readers with you. Daily blog publishing
is immensely need to grow your blog. Suppose you will travel for 1 week then
how you can publish post? Sometime in travelled area we won’t get any internet
access or sometime we have different long time vacation or religious festival
like Eid, Puja or Christmas day or Exam. At that time we don’t get enough time
to make any post to keep running our blog. Even if you are running your blog
with multiple author you won’t be able to update blog. So we have to think for
any alternative.
Blogger has given this
opportunity from the beginning through an option, known as schedule update. Though
this is a simple option but we can utilize this option when we travel or on
vacation. When you planning to travel then easily you can update your blog. For
this update you have to write some post earlier before you leave for vacation
or any other occasions and you can publish it according to your desire time.
Suppose you have written 7
articles for publishing in your blog within 7 days. Now put the articles on
seven separate post by using New Post option. Under Sidebar you will find
Schedule update and you have to select your post publish date and time. And see
within your schedule time your posts are publishing. Even your visitors won’t
notice that you are out of town. So I am going to explain below step by step
below with graphical representation.
How to schedule a blogger post in blogger?
Step 1 Log in to your Blogger Account and Go to your Blogger Dashboard
Step 2 Click on Now click on -> New Post
Step 3 Now Click on Post Settings-> Schedule from Right Side Bar


Step 5 And Press on "Publish post". At this point, your blog post will go into a queue and will not appear until the scheduled date and time.
Step 6 Now see you schedule Post Under All Post. It has written Scheduled and when the exact time and date will then it will publish.

Though you are away from your blog but you should announce or give notice to your readers that you have activate schedule
publish otherwise any visitors can make comments but if they don't get
reply then they may leave your blog forever. Hope this article will help
you to solve your problem when you travel and in exam hall.
Thursday, July 4, 2013
How to Create a Professional Blogger Template using Artisteer

Subscribe to:
Posts (Atom)

 Posts
Posts

